> ## Documentation Index
> Fetch the complete documentation index at: https://docs.layarva.com/llms.txt
> Use this file to discover all available pages before exploring further.
# Design and Print Queue Tickets
> Create a 58 mm or 80 mm thermal ticket template, set the Queue default, and configure Kiosk printing.
## Ticket output has two layers
* A **Print Template** defines the immutable visual payload: paper width, block order, typography, logo, dates, ticket number, service, QR code, and footer.
* A **Kiosk** selects the Queue Unit, customer-facing Kiosk Template, service Categories, Print Template, and browser print behavior.
## Create a Print Template
1. Open the Queue Unit.
2. Select **Settings**.
3. Find **Ticket output designs**.
4. Select **Create template**.
5. Enter a template name.
6. Select **58 mm** or **80 mm** paper.
7. Optionally select **Set as default for this Queue Unit**.
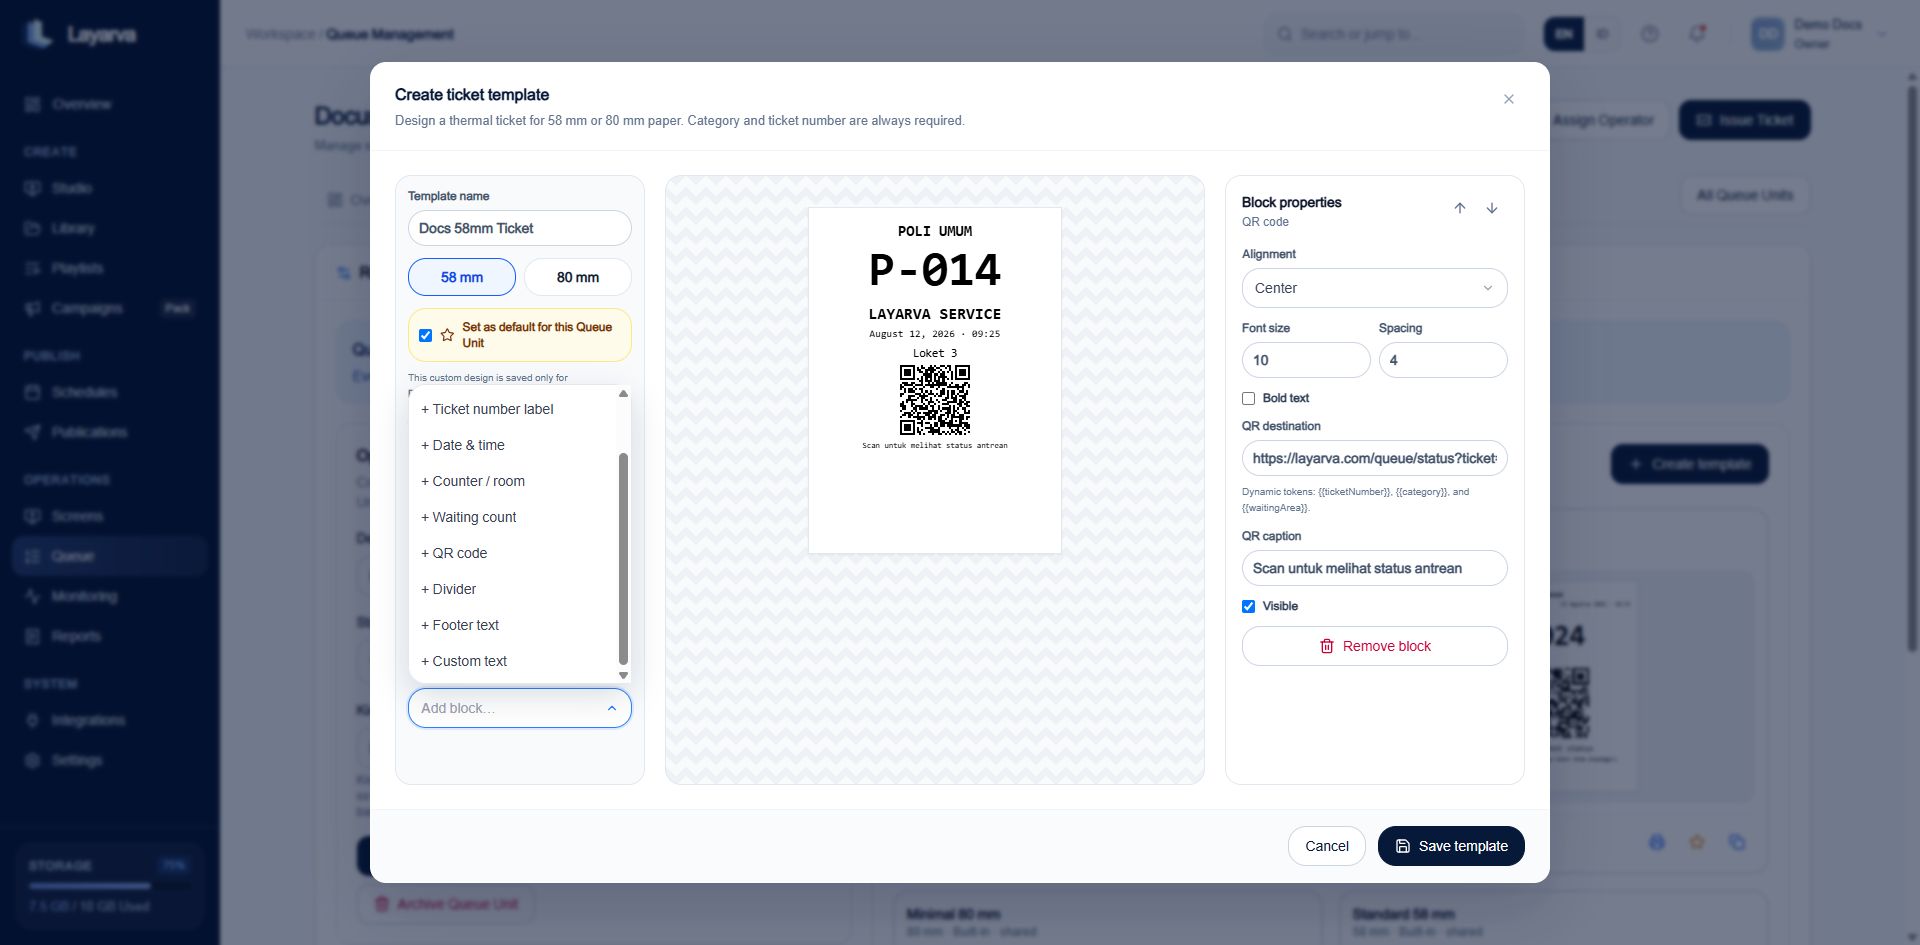 ## Build the ticket from blocks
The left column defines top-to-bottom order. Select a block to edit its properties and use the arrow controls to move it.
Common blocks include:
* Logo and company text.
* Header and custom text.
* Ticket label and ticket number.
* Service Category.
* Waiting area or waiting count.
* Issue date and time.
* Divider.
* QR code and caption.
* Footer.
Category and ticket number are required and cannot be hidden or removed. Other blocks can be added, hidden, removed, or reordered.
For each block, configure alignment, font size, spacing, bold text, and block-specific values. QR destinations can use dynamic tokens such as `{{ticketNumber}}`, `{{category}}`, and `{{waitingArea}}`.
### Logo requirements
* PNG, JPEG, or WebP.
* Maximum 300 KB.
* Ratio close to 1:1, 1.5:1, 2:1, or 1:1.5.
Select **Save template** when the preview is correct.
## Choose and test the default
From **Ticket output designs**:
* Select **Set as this Queue Unit default** so new Kiosk choices inherit it.
* Select **Test print** to open the browser's print flow with sample ticket data.
* Select **Duplicate template** before creating a variation.
* Edit or archive custom templates. Existing print jobs retain their rendered historical payload.
Confirm the physical printer uses the same 58 mm or 80 mm width as the selected template. Browser scaling, printer margins, and the operating-system printer profile can change the final output even when the preview is correct.
## Configure a Kiosk to print
1. Open **Kiosks** and create or edit a Kiosk station.
2. Select the Queue Unit and the customer-facing Kiosk Template.
3. Choose which service Categories the Kiosk may issue.
4. Select the Print Template.
5. Enable and configure browser printing for the attached thermal printer.
6. Save, review the Kiosk in **Ready**, and activate it.
7. Issue one test ticket and verify the Kiosk activity and print-job evidence.
A paired Cloud Kiosk owns its station configuration. A Kiosk running through Edge enrolls with the branch PIN and uses the Queue Unit's default Kiosk appearance and default Print Template.
## Related guides
* [Configure a Queue Unit](/queue/configuration)
* [Queue Management Overview](/queue/overview)
## Build the ticket from blocks
The left column defines top-to-bottom order. Select a block to edit its properties and use the arrow controls to move it.
Common blocks include:
* Logo and company text.
* Header and custom text.
* Ticket label and ticket number.
* Service Category.
* Waiting area or waiting count.
* Issue date and time.
* Divider.
* QR code and caption.
* Footer.
Category and ticket number are required and cannot be hidden or removed. Other blocks can be added, hidden, removed, or reordered.
For each block, configure alignment, font size, spacing, bold text, and block-specific values. QR destinations can use dynamic tokens such as `{{ticketNumber}}`, `{{category}}`, and `{{waitingArea}}`.
### Logo requirements
* PNG, JPEG, or WebP.
* Maximum 300 KB.
* Ratio close to 1:1, 1.5:1, 2:1, or 1:1.5.
Select **Save template** when the preview is correct.
## Choose and test the default
From **Ticket output designs**:
* Select **Set as this Queue Unit default** so new Kiosk choices inherit it.
* Select **Test print** to open the browser's print flow with sample ticket data.
* Select **Duplicate template** before creating a variation.
* Edit or archive custom templates. Existing print jobs retain their rendered historical payload.
Confirm the physical printer uses the same 58 mm or 80 mm width as the selected template. Browser scaling, printer margins, and the operating-system printer profile can change the final output even when the preview is correct.
## Configure a Kiosk to print
1. Open **Kiosks** and create or edit a Kiosk station.
2. Select the Queue Unit and the customer-facing Kiosk Template.
3. Choose which service Categories the Kiosk may issue.
4. Select the Print Template.
5. Enable and configure browser printing for the attached thermal printer.
6. Save, review the Kiosk in **Ready**, and activate it.
7. Issue one test ticket and verify the Kiosk activity and print-job evidence.
A paired Cloud Kiosk owns its station configuration. A Kiosk running through Edge enrolls with the branch PIN and uses the Queue Unit's default Kiosk appearance and default Print Template.
## Related guides
* [Configure a Queue Unit](/queue/configuration)
* [Queue Management Overview](/queue/overview)